APPLICAZIONI
Discovery
Dalle città storiche alle località più remote, Virtual Bike apre le porte a nuove realtà senza limiti in cui l’interazione è la chiave per scoprire aneddoti e curiosità sui luoghi che scegli di esplorare.
Discovery
Scopri di piùGaming
Attraverso la realtà aumentata Virtual Bike offre un’esperienza ludica indimenticabile: sfida i tuoi amici lungo percorsi emozionanti e scopri come oltrepassare i confini del gioco e dell’azione.
Gaming
Scopri di piùCare
L’ambiente protetto e controllato di Virtual Bike riduce i rischi legati all’utilizzo della bici su strada e propone l’utilizzo del supporto a chi non ha la possibilità di muoversi e viaggiare autonomamente.
Care
Scopri di piùDo it yourself!
Vuoi provare a realizzare la tua Virtual Bike in casa? Ecco come abbiamo fatto!
Scopri di piùDo it yourself
Here is a brief description of the workflow you can follow to build the installation. We used several technologies to build up our installation, and we tried a lot of possible solutions. We needed to know what was the speed we were running, and if we were turning right or left. In the end we decided to use an IR sensor for the steering and a bike computer sensor and a magnet to detect each rotation of the wheel (and the speed). We used Arduino to connect the hardware sensors, Unity3D for the game, a MIDI keyboard to let the player use some special bonus, and a Java-based code to connect hardware and software.
STEP ONE – Shoot the path.
Use a good camera (we used a GOPRO cam that allows a beautiful wide angle video), if you want your videos to be more stable, you might consider using a steady cam, and don’t forget to bring a lot of patience too! Once you have collected one or more videos, you have to stabilize them (use the video-editing tool you prefer) and create a single long video.
For a good video you must take into account:
- The speed has to be constant throughout the path.
- The vanishing point of the street must be at the center of the frame.
- The horizon must be at the same level.
STEP TWO – Build up the bike
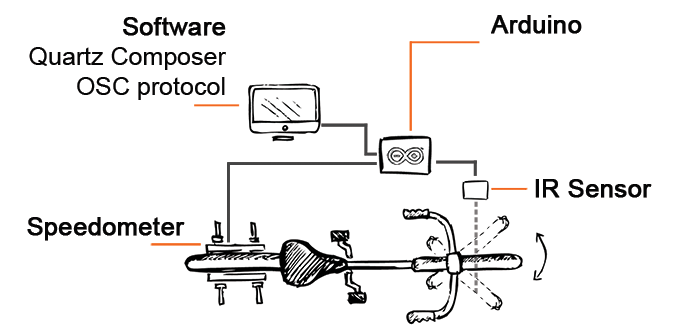
Ok, let’s start with the funny part! Tools you might need… a bike (really? :) an Arduino Ethernet (or a Arduino + Ethernet shield) a bike speedometer an IR sensor (we used one from Sharp IR sensors family) cables a Mac The bike speedometer is actually a simple button: usually there are two wires, one for power and the other one attached to the other end of the switch. You can use them in the same way “simple button tutorial” shows. After that you need the IR sensor to know if you are steering left/right: just put it on a distance of about 60 cm on the side of the bike, parallel to the ground, pointing the wheel: it’ll measure the distance from the sensor to the wheel (be careful to fill-in the gaps between the rays of the wheel, otherwise the IR will pass the wheel!). Here you can find a tutorial to do that.
STEP THREE – Turn your bike into a virtual bike
The Arduino program will: receive the speedometer signal every time the wheel will make a complete rotation. calculate the instant speed. process the IR signal. send an OSC message trough Ethernet to the Mac. We used ArdOSC library to send OSC messages from Arduino. The OSC message will be processed in Unity in this way: the speed will be the increment of the timeline associated with the path-video (the faster you run, the faster the video will play). the rotation info will offset the video on the left or on the right (the video was recorded with a wide angle, we only show a portion of that to simulate steering).
STEP FOUR – Enjoy the ride!
We started thinking about this project to introduce the story of the neighborhood Saint Lowrence in Rome and make it more popular. It is only one of hundreds of projects about Arduino you can find on the internet.
We chose Arduino for the hardware side because of its huge opensource community: you can find any kind of tutorial, even the strangest… you’ll always find someone as crazy as you, and therefore a lot of help to work with Arduino! This makes it accessible at a large scale.